
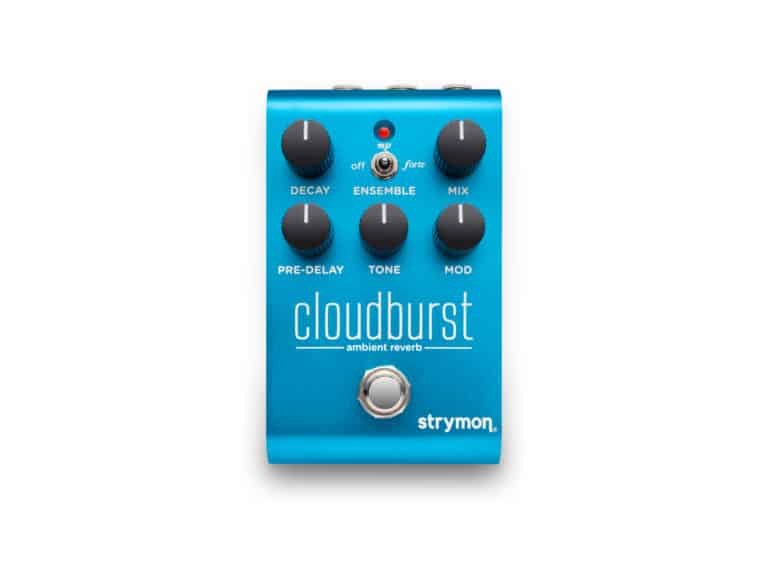
CLOUDBURST SUPPORT
Manuals
Emails
Frequently Asked Questions
Usage
To configure the EXP/MIDI jack on cloudburst:
- Press and hold the footswitch for at least 2 seconds while connecting cloudburst to power. Once the LED flashes, release the footswitch.
- Turn the MIX knob to select the function of the rear panel’s EXP/MIDI jack. The LED will change color to indicate the current status as you turn the knob.
- Expression Pedal mode: GREEN (default, minimum) – Allows continuous control over any of the knobs in any direction with a standard TRS expression pedal.
- Favorite mode: AMBER (11 o’clock) – Allows you to recall a Favorite setting using a Strymon MiniSwitch (or a MultiSwitch Plus set to TAP/FAV/BOOST mode).
- Freeze mode: RED (12 o’clock) – Using a Strymon MiniSwitch (or MultiSwitch Plus** set to TAP/FAV/BOOST mode), allows for infinitely sustained reverberation of the current input signal without new notes played being added to the reverb.
- Infinite mode: PURPLE (2 o’clock) – Using a Strymon MiniSwitch (or MultiSwitch Plus** set to TAP/FAV/BOOST mode), allows for infinitely sustained reverberation of the current input signal with new notes played being added to the reverb.
- MIDI mode: BLUE – Allows for the selection of three presets using a Strymon MultiSwitch Plus. Full MIDI functionality is available by sending MIDI Program Change messages via 1/4″ TRS MIDI connection using a Strymon Conduit or MIDI EXP cable. Up to 300 presets are available via MIDI.
- Press the footswitch to store the EXP/MIDI jack mode and begin using cloudburst.
** Please note that MultiSwitch Plus does not have a custom mode for Cloudburst, and will function the same as MiniSwitch when used with Cloudburst to control FREEZE/ INFINITE mode.
When Cloudburst is set to KILL DRY mode, your dry signal will not process through the pedal, even when you engage the FREEZE function.
When using Cloudburst without KILL DRY enabled, your dry signal will be added back into the output signal if the MIX set to maximum when the FREEZE is engaged.
To begin using cloudburst with an external MIDI device, connect the MIDI out jack from a pedal, controller, or computer interface to the EXP/MIDI jack on cloudburst. The following devices can be used to send MIDI messages to cloudburst:
- Strymon MIDI EXP cable
- Strymon Conduit MIDI Hub or a compatible 5-pin MIDI to 1⁄4” TRS MIDI Interface
- Connect cloudburst via USB to a USB host device (such as a computer) that sends MIDI
Configuring cloudburst to Use 1/4″ TRS MIDI
Set the EXP/MIDI jack to MIDI Mode
Press and hold the footswitch for at least 2 seconds while powering
up cloudburst. Once the LED flashes, release the footswitch.
Turn the MIX (EXP/MIDI JACK) knob to select the function of the rear
panel’s EXP/MIDI jack. The LED will change color to indicate the
current status as you turn the knob.
MIDI Mode: BLUE – Allows for the selection of three presets using
a Strymon MultiSwitch Plus. Full MIDI functionality is available
by sending MIDI Program Change messages via 1/4” TRS MIDI
connection using a Strymon Conduit or MIDI EXP cable. Up to 300
presets are available via MIDI.
Set the MIDI channel
Turn the DECAY (MIDI CHANNEL) knob to set the MIDI communication
channel. The LED indicates status. Your knob selections are as
follows:
• Channel 1: GREEN (default, minimum)
• Channel 2: AMBER (10 o’clock)
• Channel 3: RED (12 o’clock)
• Channel 4-16: BLUE (maximum) – set by next received MIDI
Program Change message, requires 1⁄4″ MIDI connection
Once the LED turns BLUE, it will blink until the pedal receives a
MIDI Program Change message. Once a message is received, the
pedal will be set to the MIDI channel that carried the message and
exits the Power Up Mode to allow you to begin using cloudburst.
Press the footswitch to exit and store your MIDI Channel setting and
begin using cloudburst.
Set MIDI output mode
Press and hold the footswitch for at least 2 seconds while powering
up cloudburst. Once the LED flashes, release the footswitch.
Turn the PRE-DELAY (MIDI OUT) knob to select what kind of MIDI
data is sent from cloudburst to other MIDI devices. The LED will flash
momentarily to indicate your selection.
• OFF: RED (default, minimum) – No MIDI messages are sent out of
cloudburst.
• THRU: BLUE (11 o’clock) – Incoming MIDI messages are sent to
the MIDI Out without any additional MIDI messages generated by
cloudburst.
• SEND CC, OTHER: GREEN (1 o’clock) – MIDI CC and Sysex
messages generated by cloudburst are sent to the MIDI Out.
• SEND OTHER: AMBER (maximum) – Sysex messages generated
by cloudburst are sent to the MIDI Out.
Press the footswitch to store the MIDI Out Mode and exit.
Performing a Factory Reset restores the pedal to its factory default Power Up functions, and replaces all stored presets with their factory default settings.
- Press and hold the footswitch for at least 2 seconds while powering up cloudburst. Once the LED flashes, release the footswitch.
- Press and hold the footswitch again and sweep the PRE-DELAY knob from minimum to maximum and back two times. The LED will change colors at the extremes of the knob range and flash RED to indicate when the reset is taking place.
- TURN 1, from minimum to maximum: AMBER
- TURN 2, from maximum to minimum: RED
- TURN 3, from minimum to maximum: AMBER
- TURN 4, from maximum to minimum: The LED flashes RED, cloudburst resets and restarts
To configure your cloudburst and MultiSwitch Plus to work with each other:
- Press and hold the cloudburst footswitch while connecting power to the pedal. Hold for at least 2 seconds, until the LED stops blinking.
- Turn the DECAY knob all the way counter-clockwise to set the MIDI CHANNEL to Channel 1. The LED should be GREEN.
- Turn the PRE-DELAY knob to select the following MIDI OUT option:
- Send MIDI CC and Other Data: GREEN
- Send Other Data: AMBER
- Turn the MIX knob all the way clockwise to set the EXP/MIDI jack to MIDI Mode. The LED should be BLUE.
- Press the cloudburst footswitch to exit and store the MIDI CHANNEL, the MIDI OUTPUT setting, and the EXP/MIDI Jack Mode.
- Connect a TRS cable to cloudburst’s EXP/MIDI jack.
- Press and hold the A footswitch on MultiSwitch Plus while connecting the other end of the TRS cable to any one of the three jacks to set it to Preset Mode.
To save a preset on cloudburst with MultiSwitch Plus:
- Dial in the sound that you would like to save as your preset on cloudburst.
- Press and hold the cloudburst footswitch for at least 2 seconds, until the LED blinks GREEN.
- Press the A, B, or C MultiSwitch Plus footswitch to save the current state of the pedal to the desired location.
To select a preset on cloudburst with MultiSwitch Plus:
- Step on a switch that is not illuminated to recall the corresponding preset.
- Step on an illuminated switch to bypass cloudburst.
On cloudburst, the Dry Signal can be set in one of three different ways:
- By default, the Dry Signal mode on cloudburst is set to Digital mode which uses a converted dry signal and allows the MIX knob to dial out the dry signal when turned past the 3 o’clock position.
- Analog mode keeps the dry signal in analog where the MIX knob acts as a level control for the reverb effect and no longer dials out the dry signal when turned past the 3 o’clock position.
- Kill Dry mode mutes the analog dry path signal, allowing the MIX knob to strictly control the “wet” effect output level. This setting is recommended if using cloudburst within an amplifier’s parallel effects loop or a mixer’s aux or effects send.
To set the Dry Signal mode on cloudburst:
- Press and hold the footswitch for at least 2 seconds while connecting power to cloudburst. Once the LED flashes, release the footswitch.
- Turn the TONE knob to select one of the three DRY SIGNAL options. The LED will change color to indicate the current status as you turn the knob.
- Digital Mode: GREEN (default setting, minimum)
- Analog Mode: RED (12 o’clock)
- Kill Dry Mode: BLUE (maximum)
- Press the footswitch to store the Dry Signal setting and begin using cloudburst.
From the factory, with the rear I/O Mode Selector set to mono, cloudburst is set for True Bypass as the default. There are several benefits to setting cloudburst to Buffered Bypass mode:
- Preserves the high frequency response of your guitar signal through your pedal chain and long cable runs.
- Helps maintain signal levels when the pedal is both bypassed and engaged when there is an impedance mismatch between the pedals’ output and the device it is connected to.
- If there is DC offset in the audio signal, it helps eliminate popping in the audio when engaging and bypassing the pedal.
To change the bypass mode on cloudburst:
- Press and hold the footswitch for at least 2 seconds while connecting power to cloudburst. Once the LED flashes, release the footswitch.
- Toggle the ENSEMBLE switch to choose between True Bypass or Buffered Bypass modes. The LED will change color to indicate the current status as you toggle the switch.
- True Bypass: GREEN (default, LEFT switch position)
- Buffered Bypass: RED (RIGHT switch position)
- Press the footswitch to store the Bypass mode and begin using cloudburst.
NOTE: With the rear I/O Mode Selector set to mono -> stereo or stereo, the bypass mode is automatically set to Buffered Bypass.
Cloudburst is an expanded version of the Cloud reverb algorithm found in our BigSky effect pedal and plug-in. There are a few differences between the two:
- Relative to the original Cloud algorithm, the short DECAY times on Cloudburst have been greatly expanded and refactored to extend the versatility of the reverb. These changes provide much shorter DECAY times to simulate smaller spaces, so along with the vast ambient DECAY characteristics of the original BigSky Cloud you also get great small and mid-size reverbs on Cloudburst.
- A new ENSEMBLE feature was added to Cloudburst, which generates a harmonically rich pad or soundscape reminiscent of an orchestral string section. ENSEMBLE is unique in that it follows your playing, so if you use a different pickup or play in a different part of the neck it will sound different.
- BigSky Cloud has LOW END and DIFFUSION parameters that are not adjustable in Cloudburst. These parameters are automatically adjusted “under the hood” and are determined by the position of Cloudburst’s DECAY knob, and we chose settings that we felt would create the best user experience.
Power
No, Cloudburst does not ship with a power supply. Please use a compatible power supply that outputs 9V DC, center-negative, 250mA minimum. We recommend our Ojai and Zuma isolated power supplies. You can also use a wall wart power supply with compatible specifications.
Firmware
To update the firmware on your Cloudburst to the latest firmware version, download and install our Strymon Update software from the following link:
Once you have downloaded and installed Strymon Update:
- Run the application with your powered Cloudburst connected to your computer with a USB-C data cable via the USB-C jack on the back of the pedal. Strymon Update will automatically detect Cloudburst.
- If there is a newer version of the firmware available for the connected device, click the INSTALL UPDATE button to perform the update.
- Once completed, the Installed Version will match the Available Version to show that your device is up to date.
- Disconnect the device from your computer.
- Your device is now ready for use.
We always work hard to improve the experience our customers have with our products. The release notes below list the issues we’ve resolved with Cloudburst. Download the Strymon Update software to update the firmware on your Cloudburst pedal.
Current Release
Cloudburst Firmware Rev 1.24 (Released November 2024)
Current release must be updated via Nixie 2.2.0. Download the Nixie 2.2.0 software here.
What’s New?
- Added Nixie 2.0 compatibility.
Cloudburst Firmware REV v1.21 (Released October 2023)
What’s New?
- Added secondary function ENSEMBLE mp LEVEL ADJUST for adjusting the level of the mp ENSEMBLE setting.
- Added MIDI CC# 17 for ENSEMBLE mp LEVEL ADJUST.
- Added new CUSTOM MODE for Cloudburst with MultiSwitch Plus. Cloudburst CUSTOM MODE allows combined access to PRESET 1, PRESET 2, and FREEZE/INFINITE with MultiSwitch Plus.
Cloudburst Firmware REV v1.04 (Released February 2023)
What’s Fixed?
- Kill Dry power-up function now persists between power cycles.
- Audio output is now muted when the pedal is bypassed while in Kill Dry mode.
- Pedal no longer gets stuck in Expression Pedal Setup mode if the controls are not adjusted when pressing the footswitch exiting this mode.
Warranty
Strymon Non-Transferrable Limited Warranty
Warranty
Strymon warranties its products and their varying components to be free from defects in material and workmanship for the following periods of time from the original date of purchase when purchased from an Authorized Strymon Dealer:
- Effects Pedals
- 2 Years – BigSky MX, blueSky v2, Brig, Canoga, Cloudburst, Compadre, Deco v2, DIG v2, EC-1, El Capistan v2, Fairfax, Flint v2, Iridium, Lex v2, NightSky, Riverside, Sunset, TimeLine MX, Ultraviolet, Volante, Zelzah
- 1 Year – BigSky, blueSky, Brigadier, Deco, DIG, El Capistan, Flint, Lex, Mobius, OB.1, Ola, Orbit, TimeLine
- Eurorack Modules
- 2 Years – AA.1, Magneto, StarLab
- Power Supplies
- 5 Years – Zuma, Zuma R300, Ojai, Ojai R30
- 1 Year – Factory power supplies for pedals
- Accessories
- 3 Years – PCH
- 2 Years – Conduit
- 1 Year – MiniSwitch, MultiSwitch Plus, original MultiSwitch, MIDI EXP Cables, DC Power Cables, EIAJ-05 Link Cables, 24V Power Adapter for Ojai/Ojai R30, Polarity Reversal Adapters, Voltage Doubler Adapters, Daisy-Chain Power Cables
If the product fails within the warranty period, Strymon will repair or, at our discretion, replace the product at no cost to the original purchaser.
Exclusions
This warranty covers defects in manufacturing discovered while using this product as recommended by Strymon. This warranty does not cover loss or theft, nor does the coverage extend to damage caused by misuse, abuse, unauthorized modification, improper storage, lightning, or natural disasters. Damage caused by any of the above circumstances may result in a non-warranty repair fee.
Products that were purchased from an unauthorized dealer are not covered under warranty. The warranty is non-transferrable and does not cover used or second-hand products.
Products purchased outside of your country (sales channel) have a warranty inside the country it was purchased ONLY and is not valid outside of the country it was purchased. Please contact your dealer for information on warranty and service outside of the USA and Canada.
Limits of Liability
In the case of malfunction, the purchaser’s sole recourse shall be repair or replacement, as described in the preceding paragraphs. Strymon will not be held liable to any party for damages that result from the failure of this product. Damages excluded include, but are not limited to, the following: lost profits, lost savings, damage to other equipment, and incidental or consequential damages arising from the use, or inability to use this product. In no event will Strymon be liable for more than the amount of the purchase price, not to exceed the current retail price of the product. Strymon disclaims any other warranties, express or implied. By using the product, the user accepts all terms herein.
How to Obtain Service Under this Warranty
For North American customers: Contact Strymon through our website at https://www.strymon.net/support for Return Authorization and information. Proof of original ownership may be required in the form of a purchase receipt.
For Customers Outside the USA and Canada: Contact the Strymon dealer from which the product was purchased from in order to arrange warranty repair service.
To locate your nearest authorized Strymon dealer, please use the following link:
You can also contact Strymon directly at (805) 468-8788 or (800) 980-8160 for help finding your nearest authorized Strymon dealer.
Strymon products purchased from an authorized dealer are covered by a manufacturer’s warranty. A purchase receipt from an authorized dealer is required with any request for warranty service.
Please note that any Strymon products that have been purchased from an unauthorized dealer are not eligible for coverage under the manufacturer’s warranty. If you are uncertain, please contact Strymon directly at (805) 468-8788 or (800) 980-8160 before your purchase.
***NOTE: Warranties for Strymon products are non-transferrable. Second-hand items, including sales from websites such as craigslist, Ebay, and Reverb are not covered by a manufacturer’s warranty. ***
Your warranty is valid in the region of purchase. For example, if you buy your product in Japan, any service-related issues will need to be handled in Japan. Products purchased in the United States can only be repaired in the United States.
Cloudburst Video FAQs
0:43
1:18
1:01
